
This tutorial is for 3ds Max as well as any 3D modeling program. You will learn how to set up one, two, or three background images for your Modeling Projects.
There is a lot of material to download from the internet… just Google it.
It is easier to model from a background image, whether using the actual blueprints or artists drawings.
When working with multiple artists drawings for your backgrounds, it is best to fix any uneven (disproportional) images in your paint program to make it easier when you start modeling.
When using two or three backgrounds, and they are disproportional to one another you can still “wing it” and get an accurate model done. But if you are a beginner, it makes modeling from these backgrounds more difficult.
Watch 3ds Max Tutorial:
File Downloads:
>> 50calPic>> SkullPics
One Background Image in 3ds Max -- Machine Gun
In your paint program, Crop the picture. Use the Rectangular selection.

Then go to Image/Crop on the menu. Then Flatten the layers and Save the picture as a bitmap.

Open 3ds Max. Pick a Plane object. Segs at 1. Draw a Plane in the front viewport.

Open the Material Editor. 
Pick a Material slot. Go to the Diffuse button and load the image as a bitmap.

Drag the Material Slot onto the Plane object, or click Assign Material To Selection button.

You can also use the Slate Material Editor if your version of 3ds Max supports it.

Notice that the image looks distorted on the Plane object.

We can fix this by re-dimensioning the Plane object to match the height and width of the bitmap.
Check the size of the bitmap which is 686x185

Re-dimensioning the Plane object. Using Generic units it then becomes 68.6 x 18.5

Finished model using a 1D background. Read the tutorial: Box Model a 50 Cal Machine Gun in 3ds Max

Two Background Images in 3ds Max -- Human Skull
Open the picture below in your paint program. We want the front and side pictures at the bottom.

Measure the height and width of the two images you want. Both are of equal height, so we want to Crop and Save each one with the same height in pixels.

In your 3D program create one Plane object in the Front Viewport, and one for the Right.
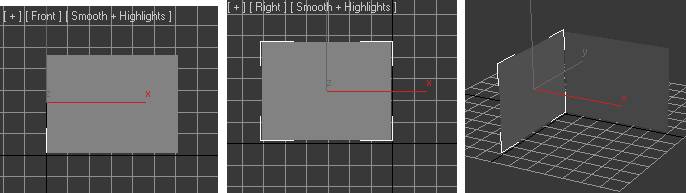
Now re-dimension each Plane object.

Move them back to the center.

If the black side is facing you then use Rotate from the toolbar. Rotate 180 degrees.
Also Check the Angle Snap.  This will increment the rotating in 5 degree movements.
This will increment the rotating in 5 degree movements.
Open the Material Editor.
Use two Material Slots. One for each Plane object. Load the bitmaps in each Diffuse Map.
If a picture is upside down the Rotate it 180 degrees.

Finished Skull. Read tutorial: How to Spline Cage Model a Human Skull in 3ds Max

Three Background Images in 3ds Max -- Flying Wing
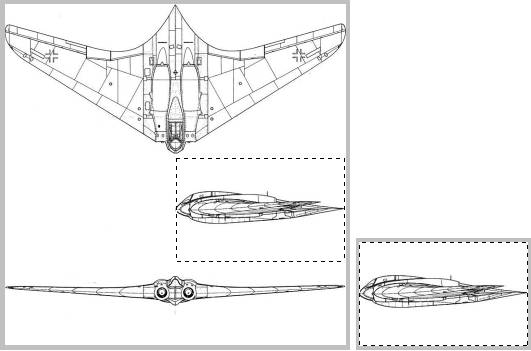
The three drawings look good as they are, but the Side view is disproportional to the Top view. That is the tail to nose dimensions are not equal.

To use these drawings, we have to make each image as proportional as possible.
Crop, Flatten, and Save the Top image as a Bitmap.

The dimensions of the wingTOP.png file in pixels is 682x298. Its 298 pixels from tail to nose.

Step Backwards. Crop,Flatten, and Save the Side image as a Bitmap.
The dimensions of the wingLEFT.png file in pixels is 337x208. Its 337 pixels tail to nose.

Scale down the Side image’s Width to match the 298 pixel tail to nose dimensions of the wingTop.png image.

Now the tail to nose dimensions are even at 298 pixels for both Side and Top images.

Step Backwards. Crop,Flatten, and Save the Front image as a Bitmap.

Make the Front width682 pixels, the same as the Top image

Change Canvas SizeHeight to the same height of the Side bitmap, which is 184 pixels. Trim any transparent areas if necessary.

Now all three bitmaps are as proportional to one another as they can get without stretching the images.
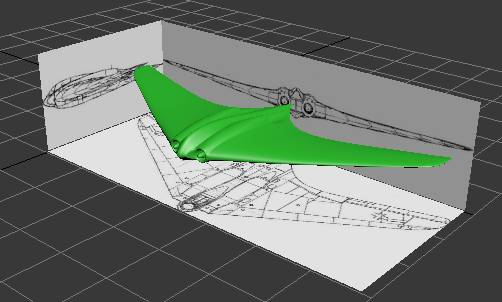
Create a Plane object in the TOP, FRONT, and SIDE viewports. Now re-dimension each Plane object.

Get your Plane objects set up in 3 dimensions.

Apply the bitmaps to each Plane object.

Add this post to your Website, Blog, or Forum:
<a href= "https://www.tutorialboneyard.com/3ds-max-background-images/" target="_blank">3ds Max Background Images</a>
If you liked this tutorial, please share with your friends!
No comments:
Post a Comment